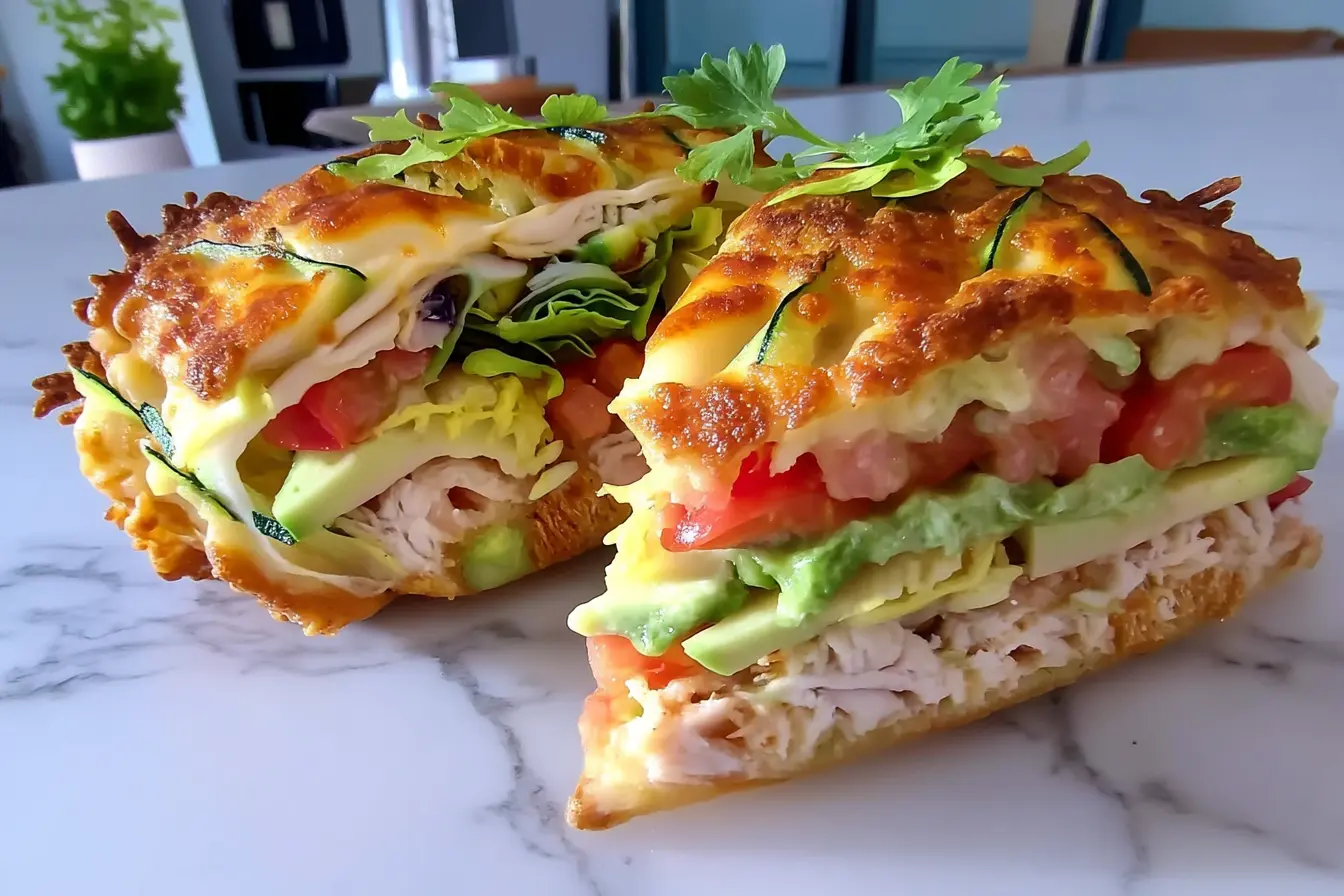
Zucchini breadwich — I first stumbled across this clever low-carb sandwich while scrolling through food videos, and let me tell you: I had to try it. I’ve made my fair share of lettuce wraps and grain-free lunches, but this one looked cheesy, golden, and honestly irresistible.
I had a couple of zucchinis, some shredded cheese, and a free afternoon, so I gave it a go. I layered everything up with garlic powder, baked it until crisp, and filled it with tender chicken, creamy avocado, and juicy tomato. One bite in, I knew this zucchini breadwich would be a regular in our kitchen.
Now it’s one of my go-to ways to build a satisfying, cozy sandwich — without the bread. This zucchini breadwich recipe is the delicious swap I never knew I needed.
Table of Contents

Cheesy Zucchini Breadwich (Full Printable Recipe)
- Total Time: 35 minutes
- Yield: Serves 2
- Diet: Gluten Free
Description
Crispy, low-carb zucchini and cheese crusts filled with juicy chicken, creamy avocado, and crisp veggies. Satisfying and gluten-free.
Ingredients
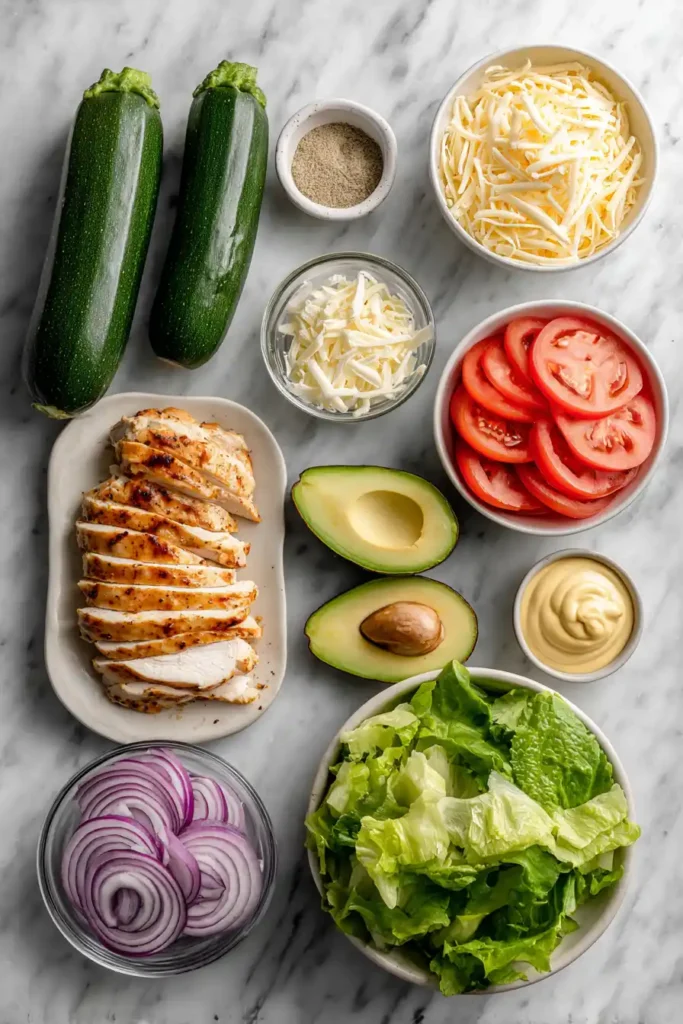
2 medium zucchinis, thinly sliced lengthwise
1½ cups shredded cheese (mozzarella or cheddar)
½ teaspoon garlic powder
1 cup cooked chicken breast, shredded or sliced
1 cup fresh lettuce, washed and dried
1 tomato, sliced
½ onion, thinly sliced (optional)
½ avocado, sliced
2 tablespoons mayo or mustard
Instructions
1. Preheat oven to 400°F (200°C). Line a sheet pan with parchment paper.
2. Sprinkle half of the cheese into two oval or rectangle shapes on the pan.
3. Layer zucchini slices on top, slightly overlapping. Sprinkle with garlic powder.
4. Top with the remaining cheese to bind the crust.
5. Bake for 25 minutes, until edges are crisp and cheese is golden.
6. Let crusts cool slightly, then remove with a spatula.
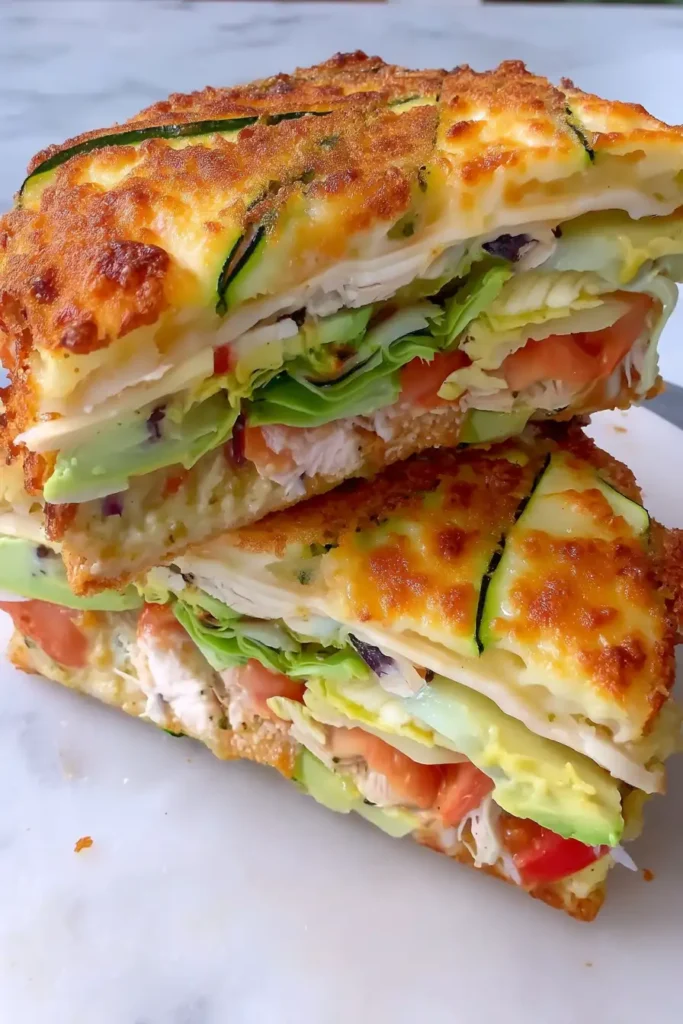
7. Assemble with chicken, avocado, tomato, onion, lettuce, and your preferred spread.
8. Slice and serve warm.
- Prep Time: 10 minutes
- Cook Time: 25 minutes
- Category: Lunch
- Method: Baking
- Cuisine: American
Nutrition
- Serving Size: 1 sandwich
- Calories: ~310 kcal
- Fat: ~20g
- Carbohydrates: ~6g
- Protein: ~23g
Why This Zucchini Breadwich Works
The Genius of Zucchini and Cheese Crusts
What makes this zucchini breadwich shine is its clever “crust.” When you bake shredded cheese, it crisps up into a golden, savory base. Add thin slices of zucchini, and you’ve got a sandwich layer that’s sturdy, flavorful, and just the right amount of chewy. Zucchini’s mild flavor lets the cheese lead, much like in this pesto langostino zucchini recipe, where zucchini acts as a savory, versatile base.
Say Goodbye to Soggy Lettuce Wraps
If you’ve ever tried to eat a lettuce-wrapped sandwich only to end up with everything falling apart, you’ll appreciate this swap. The zucchini breadwich holds fillings like a champ — no tearing, no slipping, just a satisfying, sandwich-style structure that makes low-carb eating feel easy and joyful.
Packed with Flavor
A sprinkle of garlic powder brings a cozy, savory flavor right into the crust itself. Then it’s time for the good stuff — tender chicken, smooth avocado, crunchy veggies, and a generous swipe of your favorite spread. I love using peppercorn mayo for a little zing, but classic mustard or creamy hummus are just as delicious.
What You’ll Need for Zucchini Breadwich
Kitchen Tools
You don’t need fancy gear to make a delicious zucchini breadwich — just a few trusty tools from your kitchen drawer:
- Sheet pan: Big enough to hold two sandwich-sized crusts.
- Parchment paper: Essential for keeping the cheesy crust from sticking.
- Sharp knife or mandoline: Helps you get those zucchini slices nice and thin for even baking.
- Oven: Preheat to 400°F (200°C) to crisp everything up just right.
- Spatula: To gently lift the crust once it’s baked and cooled slightly.
Ingredients for Zucchini Breadwich
This zucchini breadwich recipe uses simple ingredients you may already have on hand — fresh, flavorful, and easy to customize:
For the Zucchini Crust
- 2 medium zucchinis – Thinly sliced lengthwise
- 1½ cups shredded cheese – Mozzarella or cheddar are both great choices
- ½ teaspoon garlic powder – Brings a cozy, well-seasoned depth right into the cheesy crust
For the Fillings
- 1 cup cooked chicken breast, Use shredded or sliced pieces for a tender, protein-packed filling
- 1 cup fresh lettuce, washed and dried
- 1 tomato, sliced
- ½ onion, thinly sliced (optional)
- ½ avocado, sliced
- 2 tablespoons mayo or mustard – Peppercorn mayo adds a bold kick
This combination makes a zucchini breadwich that’s hearty, flavorful, and easy to make your own.
Pro Tip: Want extra juicy and flavorful chicken for your sandwich? Try using this grilled chicken breast recipe — it’s a simple way to add smoky depth and lean protein to your breadwich.
Step-by-Step Instructions for Zucchini Breadwich
This zucchini breadwich comes together in just about 35 minutes — and most of that is hands-off while it bakes. Just follow these cozy steps:
- Prep Time: 10 minutes
- Cook Time: 25 minutes
- Total Time: 35 minutes
Kitchen Tip: Pat the zucchini slices dry with a paper towel before baking — it makes a big difference in keeping the crust crisp and not soggy.
Let’s Get Cooking:
1. Preheat your oven to 400°F (200°C). Line a sheet pan with parchment paper.
2. Create the base: Sprinkle about half of the shredded cheese onto the parchment in two oval or rectangle shapes (roughly the size of sandwich bread slices).
3. Layer the zucchini: Neatly arrange the zucchini slices on top of the cheese, slightly overlapping. Sprinkle garlic powder over the top.
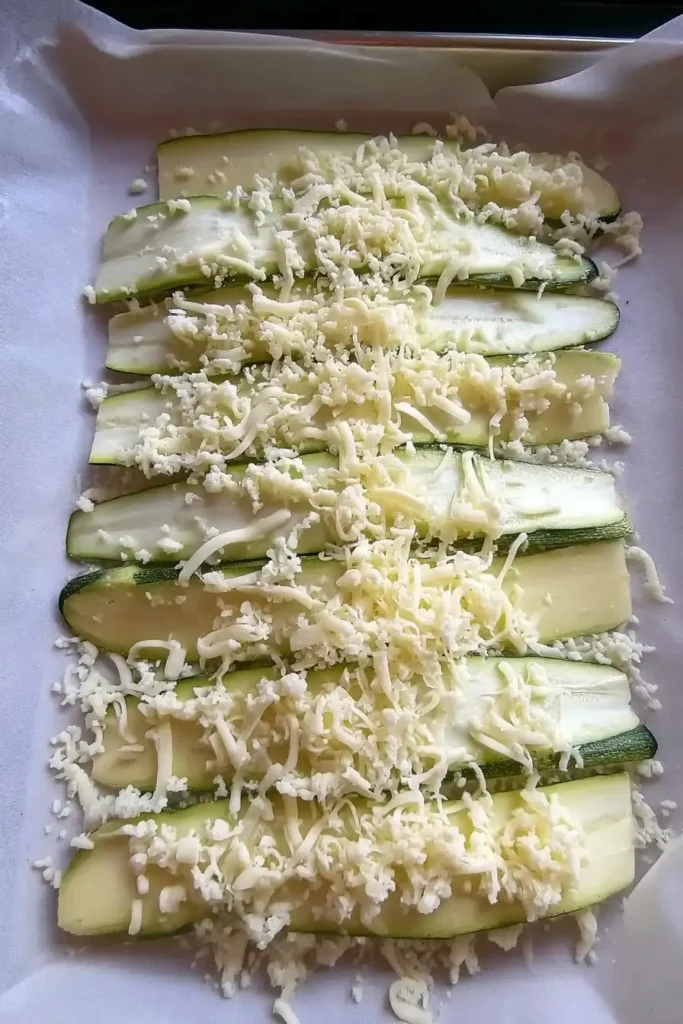
4. Top it off: Add the rest of the shredded cheese on top of the zucchini — this helps it all bake together and gives it a beautiful golden crust.
5. Bake for 25 minutes, or until the edges are crispy and the top is bubbling and golden.
6. Let the crusts cool for a few minutes, then carefully lift them off the pan with a spatula. Pile on your fillings — chicken, lettuce, tomato, onion, avocado, and whatever spread you love most.
7. Slice and serve warm — napkins optional but recommended!
Once you take that first bite, you’ll know why this cozy sandwich has become a weeknight regular in our house.
Nutrition Score for Zucchini Breadwich
One of the best parts about this zucchini breadwich is how satisfying it is — without the heavy carb crash. It’s cozy, filling, and fits beautifully into a balanced lifestyle.
Here’s the approximate nutrition per sandwich, based on standard serving sizes and USDA FoodData Central references:
- Calories: ~310 kcal
- Protein: ~23 g
- Carbohydrates: ~6 g
- Fat: ~20 g
This sandwich gives you a solid protein boost (thanks to the chicken and cheese), healthy fats from the avocado and mayo, and only a few carbs from the zucchini and veggies. It’s a feel-good, stay-full kind of meal that works for lunch, dinner, or even a hearty snack.
Just keep in mind — nutrition will vary a bit depending on what cheese and fillings you choose. But overall, this zucchini breadwich is a flavorful, low-carb option that doesn’t skimp on comfort.
Serving & Storage Tips for Zucchini Breadwich
How to Serve It
This zucchini breadwich is best served warm — right after baking while the crust is crisp and the cheese is still a little melty. I love pairing it with a handful of fresh veggies, a light salad, or even these crispy cabbage fritters on a cooler day. It’s filling on its own, but adds a lovely balance when enjoyed with something crunchy or refreshing on the side.
If you’re making lunch for a friend or prepping ahead for the week, you can easily wrap these in parchment and tuck them into a lunchbox with a cold pack. They’re surprisingly sturdy once cooled!
How to Store It
- Crusts: Store any leftover zucchini crusts in an airtight container in the fridge for up to 3 days. Place parchment between layers to keep them from sticking.
- Assembled sandwiches: Best enjoyed fresh, since the fillings can soften the crust over time. For later, keep the components separate and put everything together just before serving.
- To reheat: Pop the crusts in a toaster oven or air fryer for 3–5 minutes to bring back that crispy edge. A quick warm-up in a skillet also works.
This sandwich is one of those little kitchen wins — satisfying, make-ahead friendly, and still wonderfully fresh the next day.
FAQs About Zucchini Breadwich
Yes! Zucchini is rich in antioxidants like vitamin C and lutein, which support your immune system and help fight inflammation. It’s also low in calories, hydrating, and easy to digest — a real winner in any wholesome meal. According to WebMD, zucchini may also support heart health, digestion, and blood sugar control.
It’s simple: layer shredded cheese and thin zucchini slices on a baking sheet, season with garlic powder, then top with more cheese. Bake until golden and crispy, then fill it like a sandwich with your favorite ingredients.
Avoid keeping zucchini next to ethylene-producing fruits like bananas, apples, or avocados. They speed up ripening and can make zucchini spoil faster.
Nope! Keep the skin on — it adds color, texture, and extra nutrients like fiber and antioxidants. Just give them a quick rinse before slicing.
These quick answers help you feel confident in the kitchen — especially if zucchini is still new territory for you.
Final Thoughts on Zucchini Breadwich
There’s something so comforting about finding a recipe that just works — especially when it’s wholesome, satisfying, and easy enough for a busy weeknight. This zucchini breadwich has become that for me: a go-to meal that feels cozy and indulgent, but still light and nourishing.
It’s not just a sandwich — it’s a little kitchen win. The crispy-cheesy crust, the creamy avocado, the tender chicken… every bite is full of flavor and heart. Whether you’re cutting carbs, eating gluten-free, or just looking to shake up your lunch routine, this recipe brings joy to the table.
I’d love to see how you make it your own! Snap a photo and share your zucchini breadwich creation with me — because the best part of cooking is sharing it with others.
Looking for a refreshing side to balance this cozy sandwich? You might also like this quinoa broccoli spoon salad — it’s light, nutrient-packed, and a perfect meal prep companion.